Showing posts with label DIY. Show all posts

Friday, March 1

Mason's Camping Party


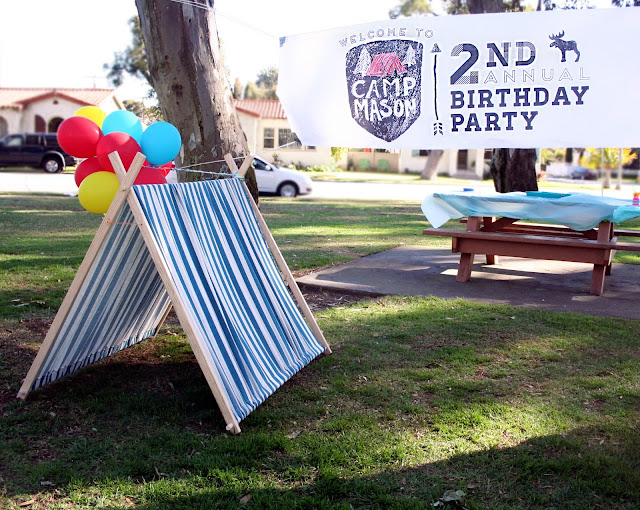
There you have it Mason's fun little camping party! We did everything ourselves (with help from our families). My dad made the tent following this tutorial. Instead of a cake I made S'mores cupcakes, inspired by this pin. The party favor was inspired by this pin. I bought the flashlights here. The 8ft banner and large bear poster were surprisingly affordable ($15 for both). I had them printed on a large format plotter in black and white (what they print blueprints on) and colored in the tent with crayons. I found the red wrapping paper that's covering the boxes on the table at Target, on Clearance for $2 right after Christmas (it kind of was the jumping off point for this party). My mom brought salad and fruit, and I made all the goodies with help from my mother-in-law. The s'more pops were a huge hit (inspired by this pin)! Instead of using the normal jumbo marshmallows, I used the GIGANTIC ones and they were absolutely delicious (make some, you won't be sorry). For entertainment we had bubbles and balls for the kids to play with, and the adults chatted and played a frisbee game called can jam. I love how it all turned out, it was casual, fun, and pretty low stress. I hope this inspires you for your next party!

**UPDATE** THE INVITATION, BEAR POSTER, AND PARTY BANNER ARE NOW AVAILABLE ON ETSY!

Friday, February 8

Printable Valentine Part 3- I Think You're DINO-MITE!


Ok friends, here is part 3 of my printable valentines series. This one is my little Mason's favorite (I practically had to pry the dinosaurs out of his hand to photograph these). I found these mini dinos at the dollar tree and I love them! seriously, neon dinosaurs? How can you go wrong? Plus, I created these so you can get 6 per sheet. Let's take a closer look at these bright little dinos!


Look at that face, he is just begging to be on a valentine! If you would like, you could also put the dino in a bag and fold the valentine over the top and staple it. If you missed them, check out part 1 and part 2 of the series. Click the download button below to get the printable valentine before they're extinct (get it)!


Terms of Use: This download is for personal use only and may not be reproduced or distributed without written consent of Emily Camp. You are welcome to publish 1 photo with a link back to this post (not the download itself) with credit if you want to share the post on your own blog. If you wish to use more photos, or would like to use the download for any purpose besides personal, please email Emily Camp with any requests. Thank You.


Wednesday, February 6

Printable Valentine Part 2- You Make My Heart Jump


So how did you like the "nuts for you" valentine? Cute right? Well if you're looking for something with a little less sugar, how about part 2 of my valentine series? This would be great for boys or girls (and I created a version in blue and red for boys) and is super easy to put together! I found this jump rope at the Dollar Tree near my house, but I bet you could find some for even less online here.


There's even a cute little spot for you to write who it's for. Be sure to download the file below and check in again Friday for part 3 of the valentine series. It's sure to be dino-mite!


To make these, click the download button below and then follow these instructions:

1. print the file on preferred paper (I like basic card stock). when printing be sure to select your "borderless printing" option and you will be able to fit 3 of the valentines per page.
2. cut on the light gray lines
3. fold on the line between the white area and the red patterned area
4. fold again, 1 in from your first fold in the red patterned area.
5. wrap around the jump rope and staple or tape shut.


Terms of Use: This download is for personal use only and may not be reproduced or distributed without written consent of Emily Camp. You are welcome to publish 1 photo with a link back to this post (not the download itself) with credit if you want to share the post on your own blog. If you wish to use more photos, or would like to use the download for any purpose besides personal, please email Emily Camp with any requests. Thank You.

Monday, February 4

Printable Valentine Part 1- I'm Nuts For You


So I sort of love Valentine's Day. I do, not for flowers or chocolates or teddy bears. I love it because it gives me an excuse to make really cute and cheesy printables like this one (theres more where this came from).


This is just a really cute and easy valentine to hand out. All you need are Circus Peanuts, celophane bags, a stapler, and this printable file. I just use the basic size treat bags that you can find in party supply stores, or I bought these at Walmart. I cut off the top of the bag so I wouldn't have to add so much candy, but you could keep the bag log and fill the whole thing with Circus Peanuts, or any kind or nut for that matter.


On the back there are spots to write who is't to and who it's from. I hope you enjoy making these as much as I did. Click the download button below to get the file and check back on Wednesday for the next Valentine Printable!


Terms of Use: This download is for personal use only and may not be reproduced or distributed without written consent of Emily Camp. You are welcome to publish 1 photo with a link back to this post (not the download itself) with credit if you would to share the post on your own blog. If you wish to use more photos, or would like to use the download for any purpose besides personal, please email Emily Camp with any requests. Thank You.

Friday, February 1

Happy February


Happy February Friends! I hope January treated you well. January in California has been amazing! I actually like winter again now that we aren't living in Idaho.

I thought since it's the first day of February I share some past valentines posts in case you're already looking for pink and red decor or you want to start DIYing some heart day cards.


For decor check out this post that is pictured above. You can print out the letter outlines and watercolor them like I did, or here's a fun idea, let your kids do it! So fun! I think I might do it again and let the little one have his hand at it.


Looking for a fun and different valentine to hand out? Check out the Lips ans 'Staches post for the printable. Want to make this Idea really fresh? Print the lips and mustaches on fun and funky colored paper! Neon pink lips? don't mind if I do! A green mustache? That's just crazy!

Be sure to check back on Monday! I have 3 new and really fun valentines to share and I will be showing off the first one on Monday! See you then.

Monday, October 29

Adding "JOY" to Your Home


Hello friends! are you ready for Halloween? I been busy making a few Halloween and Christmas projects and I thought I would offer them to you as well!


Aren't these so cute? Have you seen any string art on pinterest lately? I thought it was such a cool and simple idea so I created a few patterns myself. I decided to mix the sting art with vinyl and painted graphics as well.


So do you want to add a little "JOY" to your home? Not only are they great decor for your own home, but they would make great gifts as well! Contact me if you would like one of the designs above or something COMPLETELY CUSTOM, like a name or an initial or maybe a thanksgiving turkey, or something you dream up yourself. I can create just about anything with nails and string! You can pick the size and color of your board as well as the colors of the embroidery floss.

Think you'd like to create one yourself but don't really know where to start? I am also selling the patterns for the projects seen above, I can also create you a custom pattern for you to print and use to create your own board.

If you are interested in pricing for any of these or something custom, please leave a comment below and include your email. You can also contact me directly through my email listed at the top of the blog.

Monday, February 27

Nautical Birthday Invitation DIY


Happy Monday friends! How was your weekend? Ours was lazy, but it was great! Today II am finally sharing Mason's 1st birthday invitation with you, as well as how to create the same obre effect yourself.

For me, the basis of any good party is the invitation. It should set the overall tone for the event and give your guests a little sneak peek of what's to come! I knew from the beginning I wanted some sort of ombre effect on the card. First I tried painting different shades of blue, but since I don't know how to watercolor, it didn't turn out so fabulous (see below).


That's when I saw this post from Say Yes to Hoboken on how to dip dye tags, I thought it would be a great way to get the effect I was looking to achieve on the invitation. I, however, had to change some things up from her tutorial because: 1. I didn't have dye of any sort and I wasn't going to buy any, and 2. I didn't have a can/ cup/ vase or anything tall enough and wide enough to dip the 5x7" invitation. Below is my take on the dip dying process.

You will need:

A large enough baking dish to fit your paper, watercolors (not the dry kiddie kind), a paint brush watercolor paper, a rag, and of course water. (ignore the heart cookie cutters that was for another project).


Mix up your color in the baking dish with the water. Pour in enough water so it's about 1/4" deep. Add more paint depending on how dark you want your paper to get (you can also add more later if it isn't dark enough). Mix the paint with a paint bush to make sure there are no globs of paint on the bottom on the dish.


You will create the lightest color first. Dip your paper to the point where you want the color to start and giggle slightly to avoid a harsh line. Leave it in for just a few seconds and pull it out of the water. If it is the color you desire the dab the bottom on the rag to collect any pooling color and let it sit to dry. If you want that section darker, then put in back in the color for a few more seconds and let it dry.
When it's completely dry repete the process, but don't dip the paper in as far. This time leave the paper in the color a little longer. Continue this process till you have all the layers of color you desire. ** be sure to mix the color with your bush before each layer to avoid the globs of color on the bottom of the dish. If you don't you will end up with very thick, uneven layers of paint.


This is what my paper looked like when I was half done. Notice the little dark spots on the side? Those are globs that I missed!

That is you can dip dye an invitation!


I know what you are going to ask me, "You dip dyed every invitation?" No I did not! I dip dyed 1 invitation and scanned it in. I also painted a few sailboats to scan in so I wouldn't ruin my dip dying. After I scanned everything, I placed the in Photoshop and added my text. 


What do you think? Will you try the dip dying effect on any of your projects?

**UPDATE- TO PURCHASE THE NAUTICAL INVITATION CLICK HERE!**

Monday, February 13

"Love is Sweet" Banner Download


*UPDATE: LINK HAS BEEN REPAIRED SO YOU CAN NOW DOWNLOAD THE BANNER

Why hello there! How was your weekend?  We threw a little Valentine's shin dig. It was quite fun! This week we are getting ready for Mason's first birthday party! I can not believe it's been a whole year! I should also throw in the fact that he is a walker now (of 3 days) and we have locked up taped up all our kitchen drawers and cupboards (classy right?). Enough of my bragging.


For our party I created this happy banner to hang above the dessert table. Cute right? Do you want one?
I've decided to turn it into a DIY project for you. I will now try and explain how I did it.


I first placed each letter in Adobe Illustrator and reversed them so when they were cut out I could turn them over and not see any lines. I printed them on water color paper that I had laying around and then ON THE BACK did a few swipes of pink water color across the whole page, leaving so white areas. When that dried I went over some of the areas with red. To add some other textures I added salt to the wet water color (it leaves little dots when the paint is dry). I brushed off the salt, cut out the letters, and stapled the to a piece of yarn. The end. It was that easy!


So do you want to make one? CLICK HERE to download the letters. You can print them on any type of paper and do whatever your heart desires to them! You could use markers, colored pencils, or print them on patterned paper. This would also be a fun project to do with kids!

Have a delightful day and check back tomorrow for another Valentine's surprise!

Monday, February 6

Lips and 'Staches


*UPDATE: LINK HAS BEEN REPAIRED SO YOU CAN NOW DOWNLOAD THE LIPS AND 'STACHES
I wish I could say that this was all my idea, because if it was I'd be a genius! How cute are these? I saw these lips and 'staches when I was working in an elementary school in 2010 on Family Fun and thought they would be so cute to give the kids.


Well they were a big hit! The kids were walking around with giant mustaches and big lips all day! These are still one of my favorite valentines so I thought I would share my template with you so you can make them yourself! To download CLICK THE BUTTON BELOW


To make them just print the template on whatever color you desire, cut them out and stick a sucker in the middle. Easy peasy! If you make them I would love to see pictures, so please share!

FOR THE LIPS:

FOR THE MUSTACHES: